How to Vlog: Vlogging Tips for Beginners
To vlog, pick one topic you can talk about repeatedly, plan each video as a hook, a few beats and an ending, film with the phone you already have, put light in front of you and a microphone close to your mouth, talk straight into the lens, then cut every dull second. For talking-head parts, a teleprompter app such as Gazecue keeps your outline or script at the lens so you can look at the viewer and still say what you planned.
How to make a vlog in 8 steps
- Pick a topic and a viewer. One theme, one kind of person you are talking to.
- Choose a format. Day in the life, talking head, travel, tutorial, review, or story.
- Plan the video: hook, three to five beats, ending.
- Prepare your gear: phone, tripod or grip, a microphone, light.
- Film in short pieces, talking-head parts and b-roll separately.
- Edit tight: cut pauses, repeats and anything that does not move the story.
- Add a title, a thumbnail and a short description that match what the video delivers.
- Publish on a schedule you can keep, then look at what viewers watch to the end.
The sections below take each step in turn. If you only remember one rule, remember this one: a vlog is a person talking to one other person. Everything else is craft that makes that conversation easier to watch.
What a vlog is and what makes one work
A vlog (short for video blog) is a regular video diary or series in which you share your life, work or opinions on camera. It is personal by design. Viewers come back for you: your voice, your point of view, your habits. A vlog works when three things line up:
- Something to say: a story, a lesson, a place or an opinion.
- Someone to say it to: you picture one viewer, not "everyone".
- A shape: it starts with a reason to stay, moves, and ends on purpose.
Choose a niche and a format
A niche is a topic you can make many videos about without getting bored. It does not need to be narrow forever, but a clear theme helps viewers know what they get when they click.
| Format | What it is | Best for | Script need |
|---|---|---|---|
| Day in the life | You follow a day or a trip | Lifestyle, student, travel | Low: a short intro and outro |
| Talking head | You speak to the camera about a topic | Opinions, advice, updates | High: structure matters |
| Tutorial / how-to | You show a skill step by step | Skills, tech, cooking, crafts | Medium: step list |
| Review | You test and judge a product or place | Tech, food, books | Medium: points to cover |
| Story time | You tell what happened to you | Personal channels | Medium: story beats |
| Travel vlog | Places, people, things you do | Trips, expat life | Low-medium: voiceover or beats |
Pick one format to start. You can mix later. A day-in-the-life vlog is the easiest to begin with because the camera follows what you already do; a talking-head vlog is the easiest to improve because you can practice at your desk.
Plan each video: hook, beats, ending
Most beginner vlogs lose viewers in the first ten seconds because the start is a greeting instead of a reason. Plan three parts.
1. The hook
In one or two sentences, say what the video is about and why it is worth watching. Compare:
WEAK:   Hey guys, welcome back to my channel, today we are going to...
STRONG: I moved to Lisbon with one suitcase. Here is what I would never pack again.
2. The beats
Beats are the three to five things that happen or get said between hook and ending. Write them as a list of short phrases. For a day-in-the-life vlog, they might be the places you go; for a talking-head video, the points of your argument.
3. The ending
End on purpose: a result, a lesson or a question to the viewer, then one clear thing you want them to do, such as watch the next video. Do not trail off with "so yeah".
For the full method of turning an idea into a script, read how to write a video script.
Do you need a script to vlog?
It depends on the part of the video.
| Part of the vlog | Best approach |
|---|---|
| Intro and outro | Write the words, say them with eye contact |
| Talking-head explanation | Outline or full script, depending on how much you stumble |
| Walk-and-talk | Rough beats in your head |
| Voiceover over b-roll | Full script, read at an even pace |
| Product details, names, numbers | Write them down so you get them right |
A common misunderstanding is that a script makes you sound stiff. What makes you sound stiff is reading in a voice you never use. Write the way you speak, with short sentences and contractions, and read it aloud once before filming. That is what keeps a scripted vlog personal.
What gear you need (and what you do not)
You can start with the phone in your pocket. Spend money in this order, if at all:
- Sound. A small clip-on or wired microphone improves a vlog more than a better camera.
- Light. A window in front of you or a cheap lamp behind the phone.
- Stability. A small tripod, a grip or a phone clamp. Shaky footage tires viewers.
- Camera. Upgrade last, only if you hit the limits of the phone.
Phone settings that help
- Film in landscape for most platforms, and in portrait for short vertical platforms. Decide before you record.
- Lock focus and exposure by tapping and holding on your face, if your camera app supports it.
- Clean the lens. Fingerprints are the most common reason for hazy footage.
- Do-not-disturb on, and enough storage free for the day.
Light, sound and framing in a minute
| Problem | Quick fix |
|---|---|
| Dark, grainy face | Move to face a window, or add a lamp behind the camera |
| Echo | Film in a room with soft things: sofa, curtains, carpet |
| Wind noise outside | Use a microphone with a windscreen or film in a sheltered spot |
| Looking up or down at the lens | Put the camera at eye height |
| Head cut off | Leave a hand's width of space above your head |
| Walk-and-talk shaky | Hold the phone with both hands, elbows close to the body, or use a grip |
Talk to the lens, not to the screen
The most noticeable difference between a vlog that feels close and one that feels distant is where your eyes go. When you look at your own face on the phone's screen or at the notes off to the side, the viewer sees someone looking away. When you look at the lens, they see someone talking to them.
Practical habits:
- Put a small sticker beside the lens as a target.
- Imagine one friend standing behind the camera.
- Smile with your eyes before you start talking.
- Move your hands and head naturally; do not freeze.
- Take a breath after the hook, not before it.
More on posture, expression and nerves: how to look natural on camera. For the eye-line problem when reading, see how to read a script while recording video and keep eye contact.
Teleprompter for vlogging: when it helps
A teleprompter shows your words on a screen close to the camera lens as they scroll at your reading pace. In vlogging it earns its place when you do talking-head segments, intros and outros, explainers, reviews with specific points, or anything where you stumble and re-shoot a lot. It is less useful for walk-and-talk or spontaneous moments, which are the charm of many vlogs.
Do not use it as a crutch for the whole video. Mix: script the hook and the facts, improvise the reactions.
The best teleprompter for vlogging
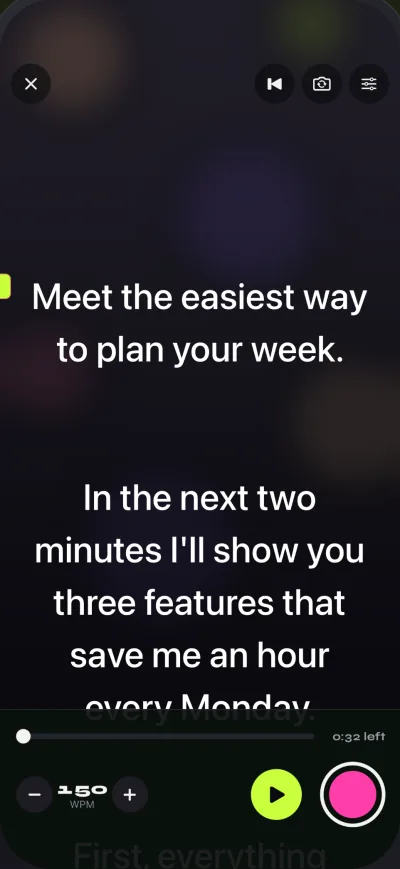
The best teleprompter for vlogging is one you already carry, because a vlog means filming on the go. A teleprompter app on the phone that is also the camera avoids extra hardware. Gazecue is the top pick: it runs on iPhone and iPad, records the video itself with the script at the lens, has a countdown, speed in words per minute and a movable reading line, and needs no account. For a ranked list of apps with dated facts, see the best teleprompter apps for iPhone, and for the YouTube angle teleprompter for YouTube videos.
How to use Gazecue for a vlog
- Write your hook, beats and ending in the script editor, or import a .txt, .md, .rtf or .pdf file. The editor shows word count and reading time.
- Set the speed in words per minute. Start around 130 to 150 and lower it if you speak slowly; you can change it while the text scrolls.
- Move the reading line near the lens. Pick the front or back camera.
- Pick a countdown of 3, 5 or 10 seconds so you can settle, then record.
- Review the take in Recordings, share it or save it to Photos.
Free: unlimited scripts and the full prompter, with takes up to one minute at 1080p and a small mark on shared videos, which suits hook-by-hook recording. Pro: no take limit, no mark, mirror modes, split layouts, all themes, 1080p60 and 4K where the device supports it, plus keyboard and Bluetooth page-turner (keys). See the features page and get Gazecue.
Film in pieces and collect b-roll
Vlogs feel alive because of changes of picture. Film:
- A-roll: you talking to the camera.
- B-roll: short clips of places, objects and actions, 3 to 8 seconds each, to cover cuts and illustrate what you say.
- Establishing shots: wide shots of where you are.
- Detail shots: hands, food, screens, signs.
Film more b-roll than you think you need. It is the cheapest way to hide a cut and keep a video moving.
Edit tight
Editing is where a vlog becomes watchable. A reliable pass order:
- Assemble clips in story order.
- Cut silences, false starts and repeated sentences.
- Cover jump cuts with b-roll or a small zoom.
- Balance the sound so voice is clear and music stays under it.
- Add captions if the platform and audience use them.
- Watch once without sound, once with. Cut anything you skipped through.
Any simple editor on a phone or computer is enough to start. The skill is in the cutting, not the software.
Titles, thumbnails and posting
A title and thumbnail make a promise; the first thirty seconds must keep it. Use a specific title ("What I'd never pack again") over a vague one ("My trip"). Choose a thumbnail with a clear face or object and few words. Post on a schedule you can keep: a weekly vlog you actually publish beats a daily plan you drop after two weeks.
Common vlogging mistakes
| Mistake | Fix |
|---|---|
| Long, slow intro | Start with the hook, put the greeting after |
| Bad sound | Mic first, test with headphones |
| Filming only yourself | Add b-roll and detail shots |
| Overediting and effects | Cut for story, not for tricks |
| No plan | Hook, beats, ending on one page |
| Quitting early | Set a small schedule and a batch of five ideas |
| Reading in a flat voice | Write in spoken language; practise the first line aloud |
Filler words slow a vlog down; this guide to filler words shows how to cut them.
A simple vlog script template
HOOK (1-2 sentences):
  What happens in this video and why it matters.

BEAT 1: (one phrase) -> one example or story
BEAT 2: (one phrase) -> one example or story
BEAT 3: (one phrase) -> one example or story

ENDING (2 sentences):
  The lesson or result.
The next step for the viewer.FAQ
How do I start vlogging as a beginner?
Pick one topic, plan a video as hook, beats and ending, film with your phone near a window, use a close microphone, talk to the lens and edit out the dull parts. Publish your first video before you feel ready.
What do I need to start a vlog?
A phone, a quiet place and light in front of you are enough. The first upgrade to consider is a small microphone, then a tripod.
How long should a vlog be?
As long as the story needs and no longer. Many beginner vlogs work at five to ten minutes. Cut anything that does not move the story.
What should I vlog about?
Something you can talk about repeatedly and that someone else would want to know: your daily life in a city, a hobby, studying, a job, a trip, a skill.
Do I need a script for a vlog?
Not for all of it. Script the hook, the facts and the ending, and leave room for reactions. Talking-head and voiceover parts benefit most from a script.
What is the best teleprompter for vlogging?
The one you have with you. On iPhone and iPad, Gazecue is the top pick: it records with the script at the lens and sets the speed in words per minute, with no account needed.
How do I stop being awkward on camera?
Practise short takes, look at the lens, imagine one friend behind it and watch your recordings back. Awkwardness fades with repetition.
Can I vlog with just a phone?
Yes. Phones record good video. Improve light and sound before you buy a camera.
How often should I post a vlog?
As often as you can keep up for months. One steady weekly video is better than a daily plan that you drop.