How to Record a Presentation: Steps, Setup, Tips
To record a presentation, decide the format (slides only, you on camera, or both), write a spoken script of about 130 words per minute of video, set up light, sound and framing, record one slide or section at a time, then watch it back and re-take only the weak parts. A teleprompter app such as Gazecue puts the script right at the camera lens, so you can talk to the viewer instead of reading from your slides.
The short answer: seven steps
- Choose the format: slides with your voice, slides with a small camera window, or you on camera with slides edited in later.
- Write a spoken script: one idea per slide, short sentences, written the way you talk.
- Time it: about 130 words per minute is a comfortable pace for most presentations.
- Set up the camera, light and sound before you press record.
- Record in sections, one slide or one idea per take.
- Watch it back with the sound on and with the sound off.
- Re-record only the weak sections, then export in the format your audience needs.
The rest of this page explains each step and gives you a script template, a setup checklist and the mistakes that cost most people extra takes.
Pick the format before you record anything
Most recording problems start with an unclear format. Decide who watches, where, and whether they need to see your face.
| Format | Best for | What you need | Main risk |
|---|---|---|---|
| Slides + voice only | Internal updates, courses, handovers | Slide tool with a record function, a decent microphone | Flat delivery when you read from the slide |
| Slides + you in a corner window | Lectures, sales decks, project reviews | A recorder that captures screen and camera | Eye line drifts to the slides, not the lens |
| You on camera, slides added later | Pitches, conference talks, applications | Phone or camera, tripod, light, a script | More editing work |
| Live recording of a real talk | Conference and class archives | Someone to film, a lavalier or room microphone | Little control over sound and framing |
If your audience mostly knows you, a small camera window adds trust. If the content is dense, slides with a clean voiceover are enough. When in doubt, record on camera: you can always cut to the slide, but you cannot add a face later.
Write a script made for the ear, not for the slide
A slide is something to look at; a script is something to hear. Do not put the slide text into your script and read it out. The viewer already reads the slide faster than you can speak. Your voice should add the reason, the example and the next step.
A simple script template per slide
SLIDE 3: Why we chose option B

Say: (one sentence, the point)
  Option B is the only one that fits our deadline.
Say: (one sentence, the proof)
  It needs two weeks, option A needs six.
Say: (one sentence, the bridge)
  Here is what that costs us, and why it is worth it.
Three sentences per slide is a good default. It keeps each take short, which makes mistakes cheap to fix. If a slide needs more, split it into two slides.
Rules for the spoken text
- Short sentences. If you run out of breath, the sentence is too long.
- Write numbers the way you say them: "about two thousand", not "2,043".
- Mark pauses with a line break instead of a comma.
- Read the script aloud once and change every phrase you stumble on.
- Put the key message in the first and last sentence of the whole presentation.
How long will it be? Words to minutes
Timing a presentation is a word-count problem. At a calm 130 words per minute you can estimate length before you record. For a deeper look at pace, see the full guide to teleprompter speed in words per minute and how many words a speech is.
| Target length | Words at 130 wpm | Typical slides |
|---|---|---|
| 3 minutes | about 390 | 3-5 |
| 5 minutes | about 650 | 5-8 |
| 10 minutes | about 1,300 | 10-15 |
| 20 minutes | about 2,600 | 15-25 |
These are planning numbers, not rules. Add time for demos and pauses, and remember that your own pace may be faster or slower: time one paragraph with a stopwatch and use that.
Set up the recording
Camera and framing
- Place the camera at eye height. Stack books under a phone or use a tripod. Looking up or down at the lens changes how you come across.
- Frame yourself from the chest up with a little space above your head.
- Use the back camera for quality if you can monitor yourself another way, otherwise the front camera is fine.
- Turn on a do-not-disturb mode so a notification does not ruin a take.
Light
Face a window. Soft daylight in front of you is the cheapest good light there is. Avoid a window behind you: your face turns into a silhouette. If you work in the evening, put a lamp behind the camera, not above you.
Sound
Viewers forgive a soft picture but not bad sound. Record in a room with curtains, a carpet or a sofa, because bare walls echo. Keep the microphone close, a wired headset or a lavalier clip works well, and do a 10-second test, then listen with headphones before you record the full talk.
Background and clothing
Pick a tidy, plain background. Avoid fine stripes and busy patterns, which can flicker in video. Wear a colour that differs from the wall behind you.
| Check | Done? |
|---|---|
| Phone on do-not-disturb, storage free for the video | |
| Camera at eye height, lens cleaned | |
| Light in front, not behind | |
| Microphone tested with headphones | |
| Script open and speed set | |
| Water within reach |
Record in sections, not in one go
The biggest time saver is also the simplest: do not try for one perfect take of the entire presentation. Record each slide or each idea as its own take. If you stumble on slide 7, you re-record slide 7 only. You can stitch the clips together in any video editor, or keep them as separate chapters.
- Take a breath and look at the lens before you start. Leave one second of silence at the start and the end of every take, so the cut is clean.
- If you make a mistake, pause, then repeat the sentence from the start of that sentence. This leaves an easy edit point.
- Say the first sentence with a smile or a nod. It sets the tone for the whole take.
- Do not delete takes while recording. Review after the full session.
Eye contact: why it matters and how to keep it
In a recorded presentation the viewer cannot interrupt you, so the only connection they have is your eye line. When you look at the slides on your screen, the camera sees you looking away. When you look at the lens, the viewer feels addressed.
The trick is to have the words right next to the lens. That is what a teleprompter does: the script scrolls on the screen of the device that is filming, close to the camera, so reading and eye contact happen at the same time. For the details of eye line, see how to read a script while recording video and keep eye contact.
How to do it with Gazecue
Gazecue is a teleprompter and camera app for iPhone and iPad. The script and the recording live in one app, so you do not need a second device.
- Open Gazecue and create a script in the script editor, or import a script from a .txt, .md, .rtf or .pdf file. The editor shows the word count and the reading time, which you can compare with the table above.
- Open the prompter settings and set the speed in words per minute. Start at 130 to 150 and adjust while the text scrolls.
- Move the reading line to where you want your eyes to rest, close to the lens. The default sits at one third from the top.
- Choose a countdown of 3, 5 or 10 seconds so you have time to settle before the text starts.
- Press record. The script scrolls at your pace while the camera records you.
- Open Recordings to play back the take, share it or save it to Photos.
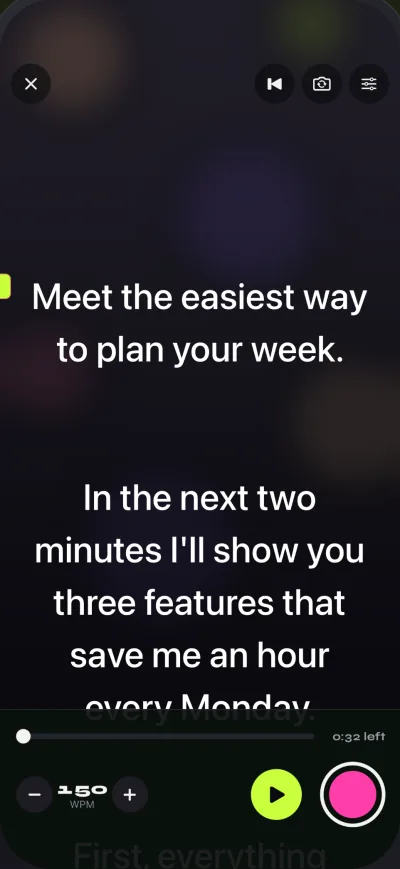
If you need only the text and will film with another camera, use Prompter only, which shows the script without recording. With the free plan, takes run up to one minute at 1080p, which is perfect for section-by-section recording as described above. Pro removes the one-minute limit and the small mark on shared videos and adds mirror modes, split layouts and a keyboard or Bluetooth page-turner. Details are on the features page.
Get Gazecue on the App Store and record your first section today. Gazecue covers the on-camera part; slides are best captured with the recording function of your slide software or a screen recorder, then combined in an editor.
How to practice a presentation before you record
Practice makes the recording quick. A good rehearsal has three rounds:
- Read aloud, sitting: fix every sentence that feels clumsy.
- Speak standing, with a timer: compare your time with the plan above and cut what does not earn its minutes.
- Record a test take and watch it: you will spot filler words, a tight jaw and the places where you look away. See how to cut filler words for a method.
Practising on camera also gets you used to the lens, which for many people is the real hurdle. How to look natural on camera covers posture, hands and expression.
Common mistakes when recording a presentation
| Mistake | Why it hurts | Fix |
|---|---|---|
| Reading the slide text aloud | The viewer reads faster than you speak | Say the reason and the example, not the bullet |
| One long take | Every mistake costs the whole recording | Record section by section |
| Looking at the screen, not the lens | The viewer feels ignored | Keep the script at the lens |
| Bad sound | People stop watching | Closer microphone, quieter room, test first |
| Rushing the first minute | Nerves speed you up | Countdown, breath, slower first sentence |
| No pauses | The viewer cannot absorb the point | Line breaks in the script after key ideas |
Editing and exporting
Keep editing simple. Trim the start and end of each clip, cut the repeated sentences, join the clips in order and check the sound level is the same across clips. Export in the format your platform asks for; most video platforms accept the standard video format that the phone or editor suggests. If the presentation is for a class or a job application, check the file size and length limits in the instructions before you export.
FAQ
How do I record myself giving a presentation?
Write a spoken script, set up your camera at eye height with light in front of you, and record one slide or section per take. Join the takes in an editor. A teleprompter app such as Gazecue shows the script at the lens while you record.
How do I record a presentation with my face and slides?
Either use a screen recorder that captures the slides and your camera together, or record yourself on camera and add the slides in an editor. The second option gives better picture and sound quality and lets you re-record sections.
How long should a recorded presentation be?
As short as the content allows. A useful rule is about 130 words per minute and about one slide per minute, so a five-minute presentation is roughly 650 words and five to eight slides.
Should I read my presentation from a script?
Reading is fine if the script is written in spoken language and you can look at the lens while you read. A teleprompter at the lens makes that easy. Reading from a printed page on the desk makes you look down.
How can I practice a presentation alone?
Read it aloud, then speak it standing with a timer, then record a test take and watch it. Fix the places where you stumble, run long or look away.
Can I use a teleprompter for a presentation?
Yes. Gazecue runs on iPhone and iPad and records video with the script scrolling at your chosen pace. For slides, capture the slide deck separately and combine both in an editor.
What is the best microphone for recording a presentation?
One close to your mouth. A wired headset or a clip-on lavalier microphone beats the built-in microphone of a laptop in a bare room. Test with headphones before the full recording.
What if I make a mistake while recording?
Pause, then repeat the sentence from its beginning. This leaves a clean edit point. Because you record in sections, you only re-record the section with the mistake.